Showing posts with label Appetizer. Show all posts

Wednesday, August 25, 2010

Baba Ganouj

Makes about 2 cups

IMG_8209

Sing with me now: “I’m in heaven, nightshade heaven…” I’m glad lots of people don’t like eggplant—more for me! Here is a recipe for the unforgettable Middle Eastern roasted eggplant dip, made from garden eggplants

1-1 1/2 pounds eggplant

olive oil for roasting

1/4 C tahini

1 clove garlic

2-3 Tbs lemon juice

3 Tbs olive oil

salt to taste

First you need to roast your eggplants. Coat them with olive oil and place them on a foil- or parchment paper-lined baking sheet. Bake at 400 degrees for about an hour until eggplants are shriveled and easily pierced with a fork.

IMG_8202 

When cool enough to handle, peel the eggplants and place the flesh in the blender or food processor with remaining ingredients. Process until smooth. Serve with pita, crackers, raw vegetables, etc.

Zucchini Madness II: Garden Strata and Basil Squash Cakes

The quest for original ideas for use of excess squash continues. We had the strata with dinner last night and the cakes were my lunch today. Honestly, I never get tired of these vegetables. They’re so light and adaptable!

Garden Strata

serves 4

IMG_8192

4 C stale bread, cubed (we used a mix of sourdough and roasted garlic)

2 C grated zucchini and/or yellow squash

1/2 red pepper, diced

1/4 C minced red onion

1/2 C diced cooked sausage (we used andouille)

1/2 C coarsely chopped fresh basil leaves

1 C milk

2 eggs

1/2 C shredded cheese (we used cheddar jack)

salt and pepper

Salt the squash and place it in a colander to drain 15 minutes. Preheat oven to 350 degrees. Squeeze out liquid from squash and combine with remaining ingredients. Stir until combined. Pour mixture into a greased 8-in square pan. Bake for 40-45 minutes, until crispy, golden and cooked through.

IMG_8189

Basil Squash Cakes

makes 6 cakes

IMG_8195

2 C shredded zucchini and/or yellow squash

1 green onion, minced

1 clove garlic, minced

1/2 C panko bread crumbs

1/4 C coarsely chopped fresh basil

1/4 C fresh grated parmesan cheese

1/4  diced fresh mozzarella cheese

salt and pepper

Mix all ingredients.

IMG_8194 

Heat a skillet over medium heat, drizzle with olive oil. Cook the cakes for 7-8 minutes per side until crispy.    

Monday, August 23, 2010

Harmony’s Creamy Pesto Dip

Makes about 2 cups

 IMG_8180

My delightful neighbor Harmony, author of the inspiring A Healthier You, recently gave us a container of her luscious and uber-healthy pesto dip. Chris and I both went crazy for it. So, having cornered her this morning where our fences meet, I asked her for the recipe. She said that she makes pesto with basil, garlic, olive oil and lemon juice (she didn’t say whether or not she adds pine nuts), then blends it into silken tofu. I came straight home and made my own batch with the quantities below.

1 16-oz container silken tofu, drained

1 clove garlic, peeled

1 C loosely packed fresh basil leaves

1 Tbs lemon juice

3 Tbs olive oil

salt to taste

Puree all ingredients in your blender or food processor.

Chris and I mostly dipped crackers and vegetables into the batch that Harmony gave us, but for lunch today I tried a few other things with my dip. I was in the mood for pasta, but I didn’t want to forgo my greens, nor did I want to turn on the stove top and start chopping stuff. So my solution was to eat my pasta over a spinach salad, and hence the Tortellini Spinach Salad was born:

IMG_8181 

I added strips of red pepper, some diced avocado and about 10 halved grape tomatoes to a pile of spinach, topped with cooked spinach-ricotta tortellini and a beautiful glob of the pesto dip. I had planned on drizzling a little balsamic vinegar, but went to my pantry and found NONE! One more thing to add to the shopping list…

I also tossed a few tablespoons of the dip with the rest of the cooked tortellini and put it in the fridge—I’m pretty sure Chris will WEEP when he finds that snack in there later today.

Sunday, May 9, 2010

Silq bi'l-Tahina (Chard Stalk Hummus),

Serves 4

IMG_7232 

I am so excited about this chard stalk hummus, and not only because of its sentimental shade of pink. I found the recipe online totally randomly, but was delighted because, it’s true, the stalks often go in the compost bin. There are no beans in the recipe, but I admit that I added about 3 tablespoons great northern beans, just thinking that Chris might like the ‘substance’ that a little legume addition imparts. I thought it was great without beans though—really just like hummus, but with this wonderful, tangy, vegetal flavor. We polished most of it off today with sesame rice crackers.

1 stalks and stems from one bunch Swiss chard, coarsely chopped

1 teaspoon salt

2 garlic cloves, peeled

1/5 C tahini

1/5 C olive oil

1/5 C fresh lemon juice

2 Tablespoons pine nuts fried for 1 minute in 1 teaspoon hot olive oil

1 teaspoon dried or 1 Tablespoon fresh chopped mint

Pita bread, crackers, raw vegetables for dipping

Place chard stalks in a pot of boiling water to cover and steam/boil until soft, about 10-20 minutes.

IMG_7193

Drain well and place in food processor. Add tahini, oil, lemon juice, garlic and salt.

IMG_7204

Process until smooth. Transfer to a serving bowl or platter; Drizzle with a little olive oil and garnish with the fried pine nuts and mint. Serve with pita bread, crackers and raw vegetables.

Friday, April 16, 2010

Roasted Red Peppers, alleged pantry staple

Most people that I would consider to be real cooks seem to always include a jar of roasted red peppers on their list of pantry staples. This has always been a bit of a mystery to me, but it might just be because, compared to flour or rice or chicken broth, it’s a rather pricey and sort of unnecessarily luxurious “staple.” But folks are always talking about how great peppers are for throwing together a quick appetizer or snack, so I decided to make a batch of my own and see what happens over the next few months.

So: set your oven to broil, line a cookie sheet with foil, and coat four red peppers with olive oil. Check the peppers every few minutes, turning them whenever you begin to see brown spots on the up side. Once they’re browned/blackened all over, you need to seal the peppers up somehow so the skins can steam loose. I locked mine into the pressure cooker (a weird solution, I agree); you could use a big ziplock or whatever. Here’s how they looked right before I sealed ‘em up:

IMG_7045 

Let them sit for 20 or 30 minutes before removing the skins. Every description I’ve ever read talks about the peppers “slipping” out of their skins. I have never had that experience. But I’ve found that it’s a little easier if you start at the stem and loosen all of the skin around it before trying to peel the pieces downward. Here’s a handsomely peeled pepper ready to be sliced:

IMG_7048

I layered some thinly sliced garlic between each layer of pepper slices.

IMG_7050

Once the jar was full (this is that sort of medium-sized mason jar; four peppers fit perfectly), I topped it off with more olive oil:

IMG_7052 

The jar is all sealed up and sitting in the fridge; I’m going to let it marinate a few days before trying anything. A few ideas for now: red pepper hummus, dip with cream cheese, vinaigrette, soup…and in strips on sandwiches.

Friday, March 12, 2010

Croquetas de Jamon

serves 6 as an appetizer


IMG_6751

Oh, blessed croquetas! This classic Spanish tapa is about as high as it could be on my list of fried favorites (a VERY short list). This was the second dish that my dear friend Sarah and I made yesterday, along with the Tinga Poblana, for the Mexican/Latin American-themed cooking club meeting. Yes, they’re actually Spanish, but ever since Chris and I ate some in Marbella over Christmas I’ve been craving them like mad, and this seemed like the closest thing to an excuse to make them as I was ever going to get. So fry away and enjoy, but only once a year, in order to preserve yourself from atherosclerosis.


1/2 cup chicken broth

8 tbsp butter

3/4 cup flour

1 1/2 cups milk

1/2 tsp nutmeg

dash of ground pepper

1/2 cup very finely hand-minced ham

2 eggs, lightly beaten with 2 teaspoons water

bread crumbs for coating

olive oil for frying


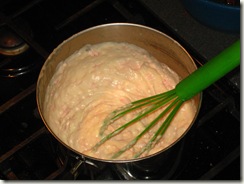
Heat the butter in a small saucepan on medium heat. Add the flour and cook for 3 minutes, stirring constantly. Gradually add the milk and the chicken broth, stirring without stopping. Add nutmeg, salt and pepper to taste. Cook over medium heat, stirring constantly, until the sauce is thickened and smooth.

Add the minced ham (make sure that it is very finely minced, so it can be mixed thoroughly with the dough—I used my food processor)and continue to cook for about 2-3 minutes on low heat, continuing to stir. Remove from heat. Taste and adjust seasoning if necessary. It should look about like this:
IMG_6750


Allow to cool for 5-10 minutes, then cover with plastic wrap and refrigerate at least 3 hours until mixture is cold. If you are preparing a day or so ahead, you can cover the mixture tightly and keep refrigerated until you are ready to fry the croquettes.

Pour the bread crumbs into a small, wide bowl. Beat the eggs with water in a small, wide bowl. Cover your hands in flour, then divide the mixture into 1-inch balls and set on a plate so that they are not touching.

Pour enough olive oil in a medium to large frying pan to cover 1/2 inch deep. Heat the olive oil for frying to about 355F degrees. Dip the croquetas in the beaten egg and coat with crumbs by rolling in bowl. Place the croquetas in the hot oil and fry quickly, turning several times, until golden. Remove the croquetas with a slotted spoon and set on a paper towel to absorb the excess oil. Serve immediately.

If croquetas will not be served immediately, place in a warm oven (200 degrees) for up to 30 minutes.

If you prefer, you can use a deep-fryer to fry the croquetas, but be sure not to over-cook them.